ThingsBoard is a platform for managing IoT devices, boasting over 1.5 million active devices connected globally. With TCP Integration, you can connect these devices using TCP (Transmission Control Protocol), which has a proven reliability rate of up to 99.9%. This integration allows devices to send and receive data reliably, and studies show that TCP significantly reduces packet loss in IoT communications by approximately 50%.
Table of Contents
Overview of TCP Integration
TCP is a reliable, connection-oriented protocol commonly used in IoT for its ability to provide error-checking and data recovery. Integrating your devices with ThingsBoard via TCP allows for seamless communication, which is essential for many IoT applications.
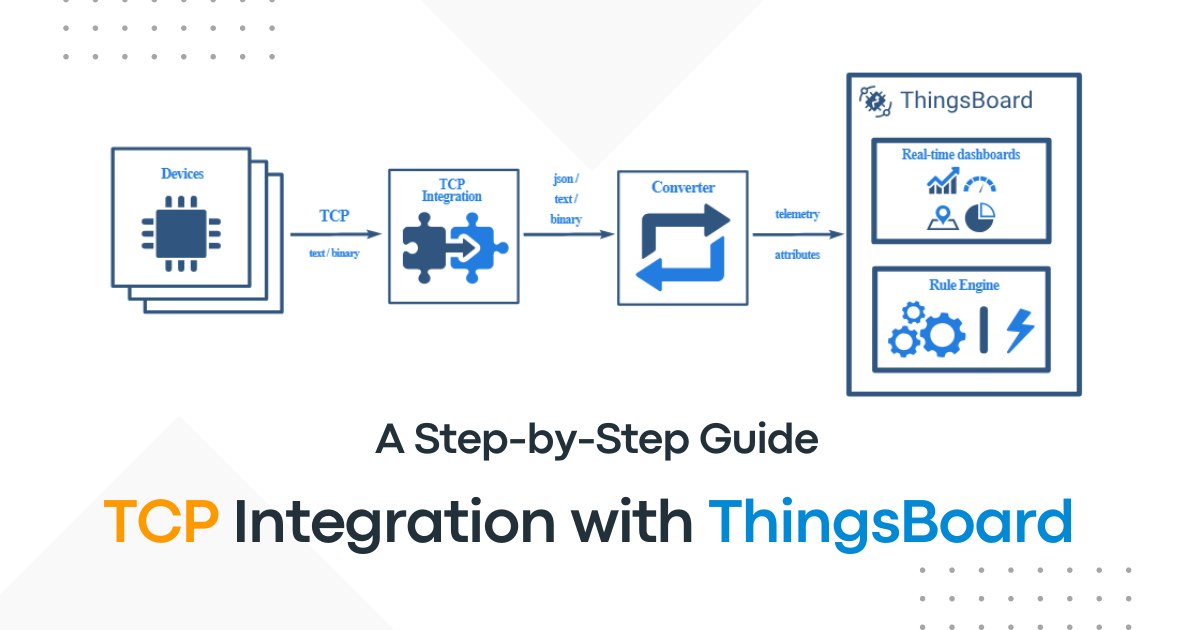
TCP (Transmission Control Protocol) Integration with ThingsBoard allows devices to communicate with the ThingsBoard platform over a TCP network. Here’s a simple breakdown of the concept:
- ThingsBoard: This is an open-source IoT (Internet of Things) platform that enables you to collect, process, and visualize data from various devices.
- TCP Protocol: This is a standard network protocol that ensures reliable data transmission over a network. It establishes a connection between devices and guarantees that the data is delivered accurately and in the right order.
- Integration Process:
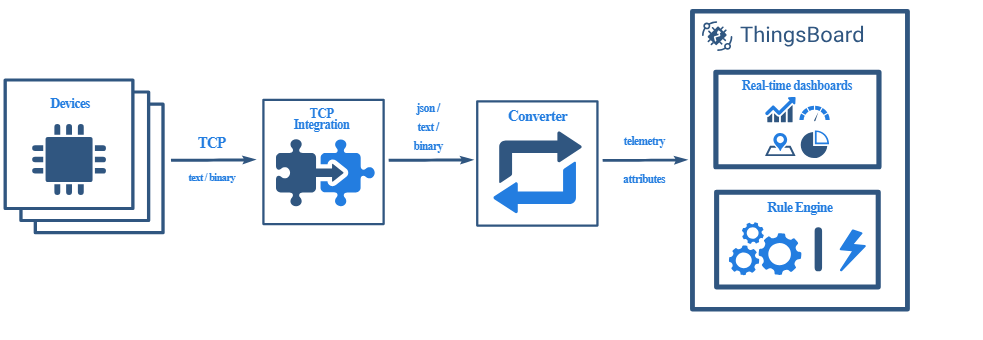
- Device Connection: Devices (like sensors) connect to ThingsBoard using TCP.
- Data Transmission: Devices send telemetry data (like temperature, humidity, etc.) and receive commands through this connection.
- ThingsBoard Handling: Once data is received, ThingsBoard processes it, stores it, and can trigger actions or visualizations based on the information.
- Benefits:
- Reliable communication with error checking.
- Continuous connection, reducing the need for frequent reconnections.
- Support for real-time data streaming.
TCP integration with ThingsBoard enables smooth and reliable communication between IoT devices and the ThingsBoard platform, allowing for effective data management and monitoring.
Only Professional Edition supports the Platform Integrations feature.
Steps to Integrate TCP with ThingsBoard
- Install ThingsBoard: First, get ThingsBoard running on your server, either locally or on a cloud service.
- Create a Device: In ThingsBoard, make a new device. This is where you’ll track the data from your IoT devices.
- Set Up TCP Integration:
- Enable TCP integration in ThingsBoard.
- Specify the TCP server settings, like the IP address and port number.
- Send Data from Your Device: Use a command to send data to ThingsBoard. For example, if your device measures temperature and humidity, you can send:
SN-002,default,temperature,25.7
SN-002,default,humidity,69 - Check Data in ThingsBoard: After sending, go to the ThingsBoard interface to see if the data shows up correctly for your device.
- Respond with Downlink Messages: You can also send commands back to your device. Use another command to send data back, like this:
SN-002,default,temperature,25.7- Set Up Downlink Converters: You can customize responses by creating converters in ThingsBoard which format incoming and outgoing messages.
- Test the Integration: Create a shared attribute (like firmware version) for your device and check if your device can send and receive messages correctly.
On the machine, where TCP Integration is running, port 10560 must be opened for incoming connections – nc utility must be able to connect to TCP socket. In case you are running it locally, it should be fine without any additional changes.
TCP Integration with ThingsBoard Professional Edition
TCP Integration in ThingsBoard allows devices that communicate via TCP transport protocol to send data to the ThingsBoard platform. This integration translates device payloads into a format that ThingsBoard can understand and process.
Integration Requirements
Prerequisites
To successfully set up TCP Integration, you’ll need:
- ThingsBoard Professional Edition (either deployed locally or via ThingsBoard Cloud).
- TCP Integration running externally, connected to the ThingsBoard instance.
- Netcat (nc) utility for establishing TCP connections to receive and transfer data.
- A command line interface (CLI) for executing commands like echo that can redirect output to netcat.
Consider the following scenario for your integration:
- You have a sensor (SN-002) that sends temperature and humidity readings to TCP Integration on port 10560.
Payload Types
Your device can send data in one of three formats:
- Text Payload
In this case, the payload looks like this:
SN-002,default,temperature,25.7\n\rSN-002,default,humidity,69- JSON Payload
In this case, the payload looks like this:
[
  {
    "deviceName": "SN-002",
    "deviceType": "default",
    "temperature": 25.7,
    "humidity": 69
  }
]- Binary Payload
For this guide, we will focus on a Binary Payload, specifically structured like this:
\x30\x30\x30\x30\x11\x53\x4e\x2d\x30\x30\x32\x64\x65\x66\x61\x75\x6c\x74\x32\x35\x2e\x37\x00\x00\x00 Payload Breakdown
Here is a detailed breakdown of the binary payload:
| Bytes | Hexadecimal | Description |
|---|---|---|
| 0-3 bytes | \x30\x30\x30\x30 | Dummy bytes (skipped) |
| 4 byte | \x11 | Payload length (17 bytes) |
| 5-10 bytes | \x53\x4e\x2d\x30\x30\x32 | Device name (SN-002) |
| 11-17 bytes | \x64\x65\x66\x61\x75\x6c\x74 | Device type (default) |
| 18-21 bytes | \x32\x35\x2e\x37 | Temperature value (25.7) |
| 22-24 bytes | \x00\x00\x00 | Dummy bytes (ignored) |
Network Configuration
- Ensure that the TCP Integration server accepts incoming connections on port 10560. If this is running on the same machine where ThingsBoard is installed, no additional configuration is generally needed. Ensure that any firewall settings permit this port.
Example Data Flow
- Start TCP Integration:
- Ensure TCP Integration is running and can receive connections.
- Send Data From Sensor:
- Your sensor will format its readings into the specified payload and send this over TCP to the configured port (10560).
- Data Reception:
- The TCP Integration will accept the incoming TCP connection and read the frames being sent from the sensor.
- Formatting for ThingsBoard:
- The integration formats the received data according to ThingsBoard specifications and processes it for visualization and use within your platform.
Step-by-step guide for adding TCP integration in ThingsBoard. This includes setting up the integration, configuring the uplink and downlink converters, and adjusting connection settings.
Add TCP Integration
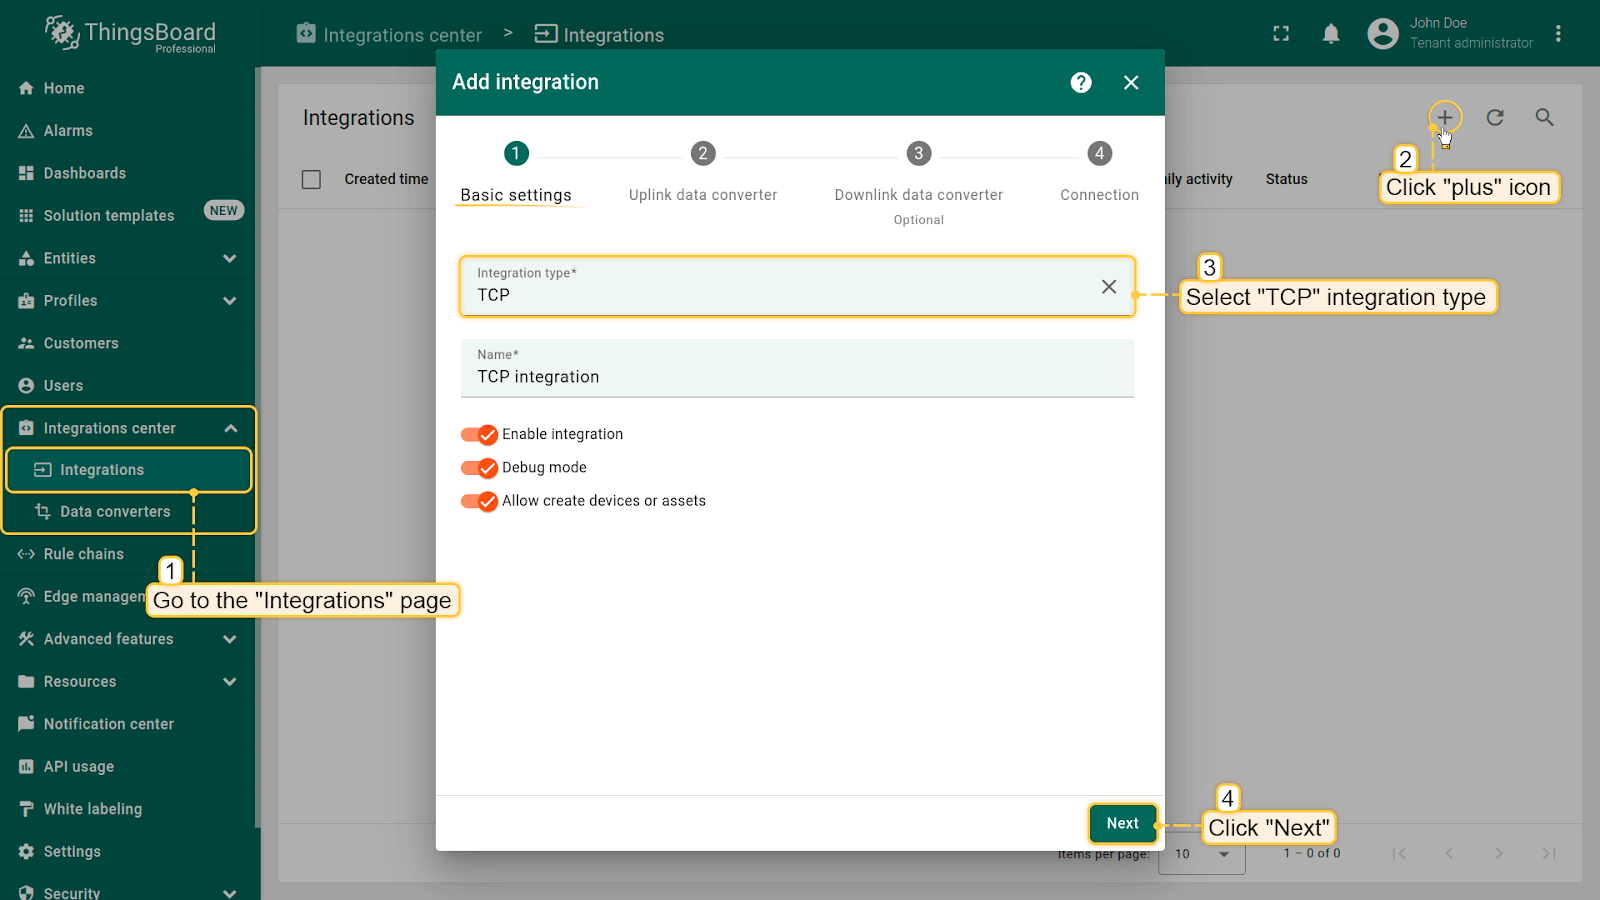
- Access Integrations:
- Navigate to the Integrations page within the Integrations center section of ThingsBoard.
- Create New Integration:
- Click the plus (+) button to initiate adding a new integration.
- Choose TCP integration and click Next to proceed.
Uplink Data Converter
- Uplink Converter:
- An uplink converter is essential for parsing and transforming the data received by TCP integration into a consumable format for ThingsBoard.
- Device name and device type are mandatory fields, while attributes and telemetry are optional.
- Choose Payload Type:
- Select the device payload type for decoder configuration:
- Text payload
- JSON payload
- Binary payload
- Select the device payload type for decoder configuration:
- Using TBEL for Decoder Configuration:
- It’s recommended to use TBEL (ThingsBoard Expression Language) for developing user-defined functions due to its efficiency.
- Copy the following TBEL script for your uplink converter:
/** Decoder **/

// decode payload to string
var strArray = decodeToString(payload);
var payloadArray = strArray.replaceAll("\"", "").replaceAll("\\\\n", "").split(',');

var telemetryPayload = {};
for (var i = 2; i < payloadArray.length; i = i + 2) {
    var telemetryKey = payloadArray[i];
    var telemetryValue = parseFloat(payloadArray[i + 1]);
    telemetryPayload[telemetryKey] = telemetryValue;
}

// Result object with device attributes/telemetry data
var result = {
    deviceName: payloadArray[0],
    deviceType: payloadArray[1],
    telemetry: telemetryPayload,
    attributes: {}
};

/** Helper functions 'decodeToString' and 'decodeToJson' are already built-in **/

return result;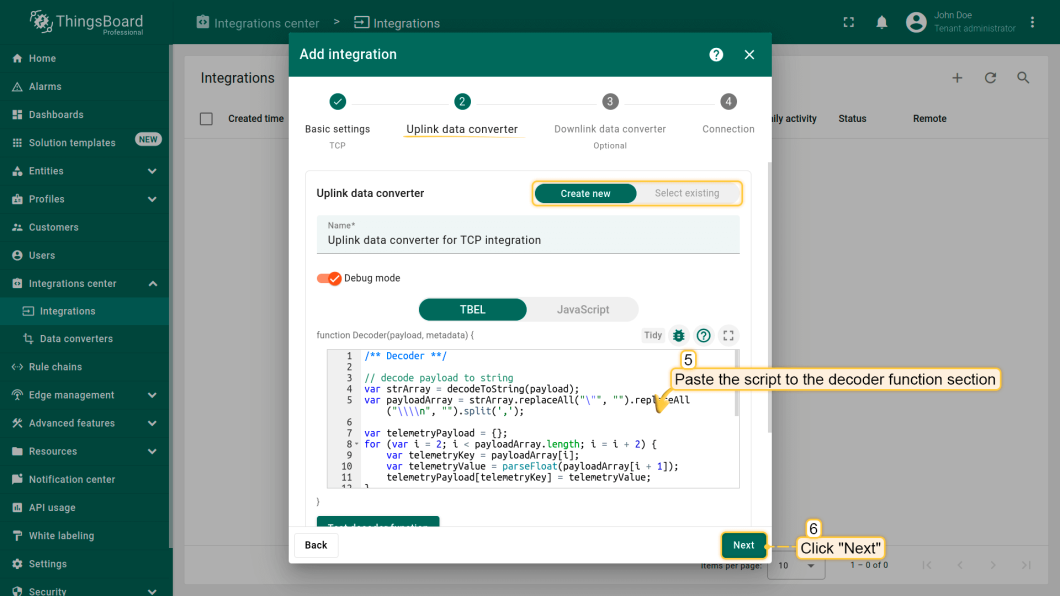
- Paste Script:
- Paste the copied TBEL script into the decoder function section.
- Debug Mode Warning:
- Note that while Debug mode is beneficial for development, it should be turned off in production to avoid excessive database space usage.
- Click Next to proceed.
Setting Up Your Downlink Data Converter
At this step, you can either select an existing downlink converter or create a new one. For simplicity, leave the Downlink data converter field empty and click Skip.
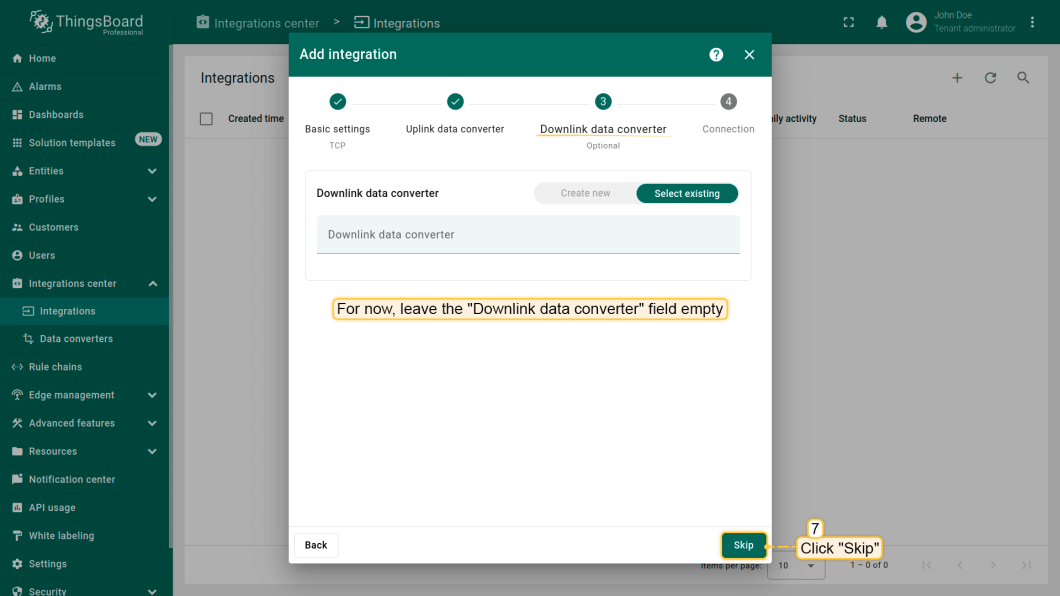
- Downlink Converter:
- At this step, you can either select an existing downlink converter or create a new one.
- For now, leave the Downlink data converter field empty and click Skip.
Connection Settings
- Connection Type:
- Ensure that the Execute Remotely option is checked. Remember, TCP Integration must be a remote type.
- Port Configuration:
- The default port for TCP Integration is 10560. If needed, you can change this to any available port.
- Record Integration Key and Secret:
- Make a note of the Integration Key and Integration Secret, as you will use these in later configurations.
- Configuring Payload Types:
- As before, select the device payload type:
- Text payload
- JSON payload
- Binary payload
- As before, select the device payload type:
- Frame Decoding Settings:
- Ensure the following settings are configured:
- Max Frame Length: Leave at default (128).
- Strip Delimiter: Enable this to remove newline delimiters from the payload.
- Message Separator: Set it to System Line Separator (newline symbol).
- Ensure the following settings are configured:
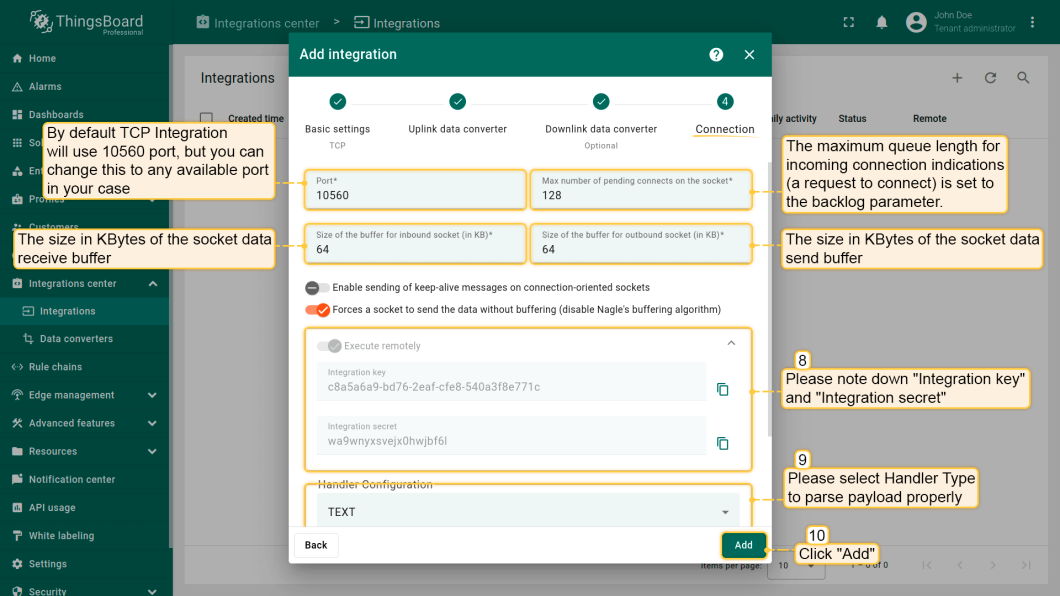
Optional Configurations (leave default):
- You may see additional configurations. Leave these at default for now:
- Max number of pending connects on the socket.
- Size of the buffers for inbound/outbound sockets.
- Enable sending of keep-alive messages.
- Disable Nagle’s algorithm for immediate data transmission.
Testing and Validation
Once your TCP integration is configured, it’s essential to test it. Use tools like Telnet or custom scripts to send dummy data to your ThingsBoard instance. Check the ThingsBoard UI to confirm that the device data appears as expected.
Troubleshooting and Optimization
- Common Issues: If data isn’t flowing through, check your port settings, firewall configurations, and integration keys.
- Performance Tips: To optimize data transfer, consider adjusting buffer sizes or monitoring network latency.
HashStudioz Technologies: A Leading IoT Gateway Manufacturing Company
Conclusion
By following this guide, you should be able to successfully integrate TCP with ThingsBoard, enabling more efficient communication for your IoT devices. This integration unlocks the potential for real-time data processing and monitoring.
Harness the Potential of IoT with HashStudioz Technologies
HashStudioz, a leading IoT solutions provider, specializes in seamless TCP integration with ThingsBoard to elevate your device communication.
TCP Integration Services: Ensure reliable data transmission between your IoT devices and ThingsBoard for enhanced performance and accuracy.
Real-Time Insights: Leverage real-time data processing to gain actionable insights that drive your business decisions.
Custom Solutions: Tailor our integration approach to fit your unique needs and goals, ensuring a perfect alignment with your operational objectives.
Expert Guidance: Work with our skilled team of IoT specialists for strategic consulting and best practices in implementing TCP with ThingsBoard.
Efficient Deployment: Get your TCP integration up and running swiftly with our streamlined implementation methodology.
24/7 Support: Benefit from ongoing support to maximize the performance of your IoT solutions and address any challenges that arise.
Why Choose HashStudioz?
IoT Experts: Our team has a wealth of experience in IoT and ThingsBoard integration, ensuring optimal results.
Proven Results: We have a successful track record of delivering robust IoT solutions that empower businesses to thrive.
Client-Focused Approach: We prioritize your needs and collaborate closely to tailor solutions that achieve your vision.
Dedicated Support: Count on us to accompany you at every stage of your IoT journey.